Recently, one of my colleagues mentioned to me that he takes large numbers of pictures and wanted to write a program to automatically determine which was in the best focus, out of a group of pictures that were taken of the same scene. He mentioned that he expected the algorithm to be computationally intensive.
My initial reaction was “it can’t be that hard” since my digital camera does it, and it has a small, low-power processor in it. So I checked out the Wikipedia article on autofocus. Two general algorithms are described, active autofocus and passive autofocus. Since I’m examining images that have already been taken, active autofocus is not an option. Within the category of passive autofocus algorithms, Wikipedia describes two methods, phase detection and contrast measurement. Again, since my images have already been captured, I will use contrast measurement. Since I don’t have a DSLR, this is the method my cameras actually use to autofocus, so that’s kind of cool, too.
So what does an autofocus system using contrast measurement consist of? I imagine a lens system, a sensor and a processor that reads the sensor, which can then adjust either the positions of the optics in the lens system or the position of the sensor relative to the lens system. When the user wants to take a picture, the processor will read the sensor, make a contrast measurement and repeat this process, sweeping the variable position part of the system through its range. Then it will select the position that gave the best contrast measurement. This matches my experience of the view through my camera’s viewfinder, especially in low-light conditions: I see the autofocus sweep through a range until the image is sharp, and then the camera takes the picture.
Thinking about this, I imagine a picture with many black-and-white stripes — if the stripes are in perfect focus, there will be many large transitions in brightness (high contrast), and if the stripes are blurred, then we would expect the transitions in brightness to be less dramatic. So I made some test 100 × 100 pixel test images with horizontal and vertical lines in the GIMP to test my algorithm on.
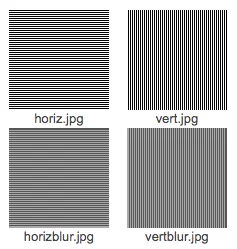
The blurred images are the result of running Filters->Blur->Blur in the GIMP over the original images.
So how to measure the contrast in a picture in a way that works quickly on a tiny low-power processor? The simplest method that came to mind was to sum the differences in pixel values across the image. This is a nice O(N) algorithm. Other methods, such as computing FFTs and looking at the high order bins, are more computationally intensive, and they don’t seem likely to be used in a consumer-grade camera.
Ideally, we’d want to look at the difference in luminance in each pixel. Conveniently, during the JPEG compression process, you normally need to perform the linear algebra to convert the R, G and B planes into Y (or luminance), Cr and Cb (chrominance) planes. So if we inserted the autofocus algorithm after this conversion in our low-powered camera, we could run it on just the luma plane. In addition to being less computationally intensive, that might be more accurate because the human eye has different sensitivities to different wavelengths of light, and using the luminance values would come closer to what we really want.
However, my algorithm operates in the RGB space because that’s what my tools support easily. I decided to use GNU Octave, a free clone of MATLAB, to develop my algorithm. While I am mostly a C/C++/Java programmer, I sometimes use Octave to prototype algorithms because it is so concise and doesn’t require recompilation. In this case, I want to concentrate on contrast detection and not the mechanics of reading and decoding JPEG files. We sometimes get algorithms from customers expressed as MATLAB or Octave code and translate them to other languages for efficiency’s sake — for instance, we recently took some MATLAB code and implemented it in CUDA so that it would run at 24 frames per second. So here’s my contrast measurement program in Octave:
img=imread("test.jpg"); c=0;
for i=img
for j=1:rows(i)-1
c+=uint64(abs(i(j)-i(j+1)));
endfor
endfor
c
As you can see, Octave let me express this algorithm very concisely. First, I read in the image into the variable img. For an M × N image, this results in a three-dimensional array of M × N × 3 RGB pixel values in the range 0-255.
I then iterate over the image, and each time i contains a vector of pixel values. Octave iteration and subscripting is a bit mysterious to me, and I always have to read the manual, but this is what it does in this case. It turns out that each of these vectors is a column vector of the image.
Then, for each of these column vectors, I accumulate the sum of the absolute value of the first differences in pixel values.
At the very end, I print out the value accumulated over the whole image. I should be able to use this program to evaluate the focus of two images, where the one with the larger result at the end should be more in focus (because it has higher contrast).
My first attempt at this program left out the uint64(), and I got results of 255 for the first images I tried. It turns out that Octave is doing saturation arithmetic, and so I need to cast the values to a wider integer. My camera takes full-resolution images at 3648 × 2736, and so if we look at the worst case of a black-and-white checkerboard, we would accumulate a value of 3648 × 2736 × 3 × 255 = 0x1C71B1C00 — a bit too large to hold in 32 bits. If we computed a combined brightness value for each pixel, we could use a 32-bit accumulator instead.
Running it over my test images above, I got the following results:
| Image | Contrast Measurement |
| horiz.jpg | 1248200 |
| horizblur.jpg | 407800 |
| vert.jpg | 0 |
| vertblur.jpg | 0 |
The horizontal stripe image works as one would expect, the in-focus image generating a higher metric than the blurred one. But what’s up with the vertical stripes? Well, it reminded me that my camera’s manual has an interesting section called “subjects that are difficult to focus on.” One of the examples given is “Subject without vertical lines.” I never understood this — until now. My camera must be looking at contrast across rows, so it has the same behavior of my Octave code, albeit in a different direction. This is further confirmation that my digital camera actually uses something very similar to this algorithm to autofocus. Let’s try the program on a real image and a blurred copy:
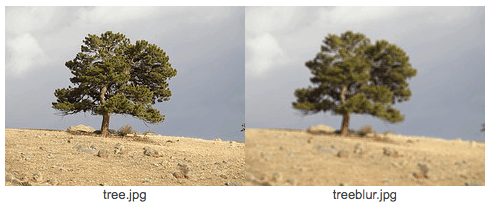
Here are the results:
| Image | Contrast Measurement |
| tree.jpg | 880167 |
| treeblur.jpg | 338791 |
As we expect, the unblurred image gives a higher contrast measurement, so the algorithm is detecting that it is more in focus.
Finally, we should note that in actual digital cameras, depth of field is variable, and thus we might have to focus on just a particular portion of the frame, the rest of the frame might intentionally be out of focus in order to draw the viewer’s attention to the subject.
This would involve just running the algorithm over a subset of the image, such as the center of the frame. Many cameras also offer the option of automatically detecting human faces and autofocusing there. Wikipedia has an article on algorithms for detecting human faces in an image as well — but maybe that’s a topic for the future.
For more discussion on the intricate relationship between big data and digital signal processing, check out our blog post on Accelerating Data Insights: Digital Signal Processing Services in Big Data Analysis and delve into how DSP techniques transform how we analyze vast datasets, enabling organizations to make more informed decisions and gain valuable insights.
Ben Mesander has more than 18 years of experience leading software development teams and implementing software. His strengths include Linux, C, C++, numerical methods, control systems and digital signal processing. His experience includes embedded software, scientific software and enterprise software development environments.