Earlier this week, I wrote about the importance of synching audio and video, something that we use in many applications. We’ve already discussed why it’s necessary, and today I want to talk about the different ways to do it, some easier than others.
Contents
Adjust the Video
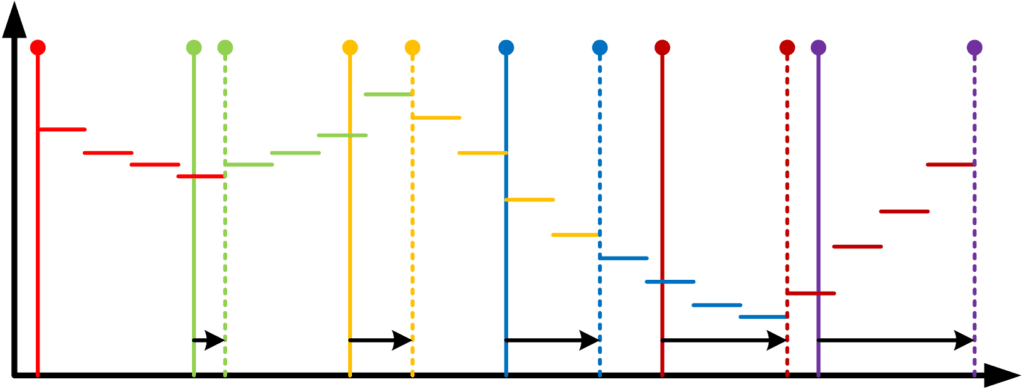
The most common and easiest way to correct for these offsets is to adjust the presentation time of the video frames to match the timestamps on the audio samples. This is a relatively simple adjustment to implement, and there’s a low impact on the user. If a video frame stays on the screen for 32 or 34 ms instead of the standard 33 ms, the viewer is unlikely to be able to tell the difference. As this image shows, small adjustments to the display time of video frames over time can easily correct for differences in the capture clocks. Here, the solid lines indicate the playback without modification, and the dashed lines indicate the playback after adjusting the video to match the audio.
Adjust the Audio
Some applications don’t allow us to adjust the playback rate of the video, or perhaps the audio and video must be synchronized to an external clock. In these cases, we have to adjust the audio, which is more complicated. The added difficulty is due to the fact that an audio sample has a duration. This is easiest to understand in the context of pausing a movie. The last video frame remains on the screen for as long as the movie is paused. On the other hand, the last audio sample plays and then there’s silence. This property is why we can’t just adjust the start time of an audio sample. Moving a sample earlier would clobber the previous sample, and moving it later would result in a gap in the audio. Instead, we have to look into different options.
Adjust Audio the Easy Way
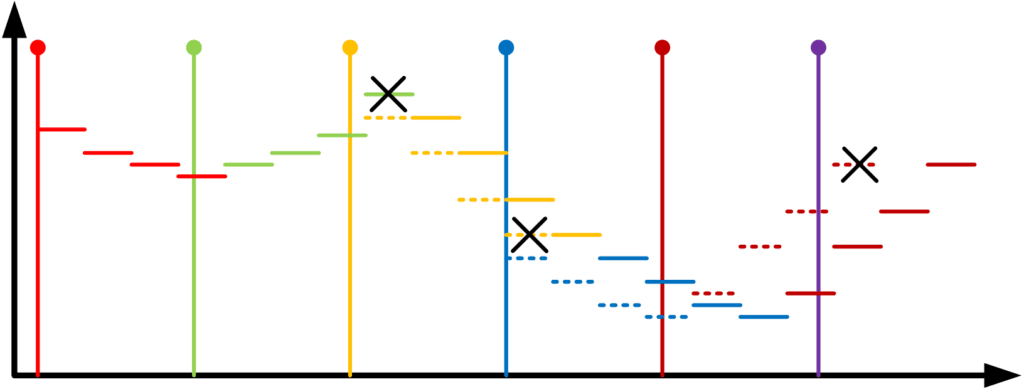
The first — and far easier — method for adjusting audio to match a particular clock is to simply drop or repeat a sample. We track the difference between the desired time and the current timestamp of the audio sample. Whenever that offset is greater than the duration of a sample, we add or drop a sample to make up the difference. In this example, the audio clock is running slow, so several samples are dropped to help the audio catch up to the video.
While this method is by far the easiest audio adjustment to implement, it’s also the most coarse correction. The listener may or may not be able to detect the audio discontinuities depending on the sample rate and the type of audio being recorded (a college lecture versus a symphony for example).
Adjust Audio the Hard(er) Way
If simply adding or dropping samples periodically results in unacceptable audio artifacts, we need to try a more sophisticated technique: approximate the audio samples. Instead of dropping a sample, we could take the average of the sample to be dropped and the one after it. The average sample would replace the two input samples. This method is a linear approximation.
Higher-order approximations can be used as well. These involve fitting a curve or a spline to a series of N audio samples and then creating either N+m or N-m audio samples based on that approximation. Finally, we could perform a Fourier Transform on batches of samples to obtain a very high fidelity model. Then, use this model to extract a different number of samples that closely match the original input. Below is a simple representation of how the approximated audio samples (dashed black lines) might represent the original audio samples using these higher order approximations.

Each of these audio adjustment options has less noticeable artifacts than simply dropping or repeating a sample, but they also have increased cost both in terms of processing power and computation time. So much so that the Fourier Transform option may only be practical for post-processing a recording and not for real-time applications.
What do I choose?
As with most design decisions, there is no right answer. All of the methods for correcting A/V sync problems have their own advantages and disadvantages. Each choice will need to be evaluated against the application, the requirements, the hardware, and the user experience to choose the option that best suits the needs of the project. We’d love to hear your comments about which methods have worked best for you!