As powerful, low energy-consumption IoT gadgets proliferate — and applications that require real-time decision-making are developed — complicated machine learning algorithms are now increasingly being leveraged to process data on devices themselves at the edge of the network.
From reducing reliance on the cloud to the improved security and real-time processing and response edge ML solutions unlock, developing ML/AI at the edge applications delivers numerous advantages. But how can a developer build edge ML/AI applications to leverage the benefits of this approach?
In this blog post, we’ll build a facial expression recognition pipeline using the OpenMV Cam H7 Plus board and AWS IoT Core, detailing the steps necessary to deploy and use a pre-trained TensorFlow model on the OpenMV board.
Contents
The OpenMV Cam
Today, it’s simple to get started with edge AI and ML. Low-power microcontroller boards, such as the OpenMV Cam, provide a mechanism for developing and implementing machine learning-based applications. The OpenMV Cam empowers developers to easily implement machine vision applications in Python. To simplify the development process, OpenMV provides a myriad of documentation resources, tools, an integrated development environment and a set of example projects aimed at streamlining development.
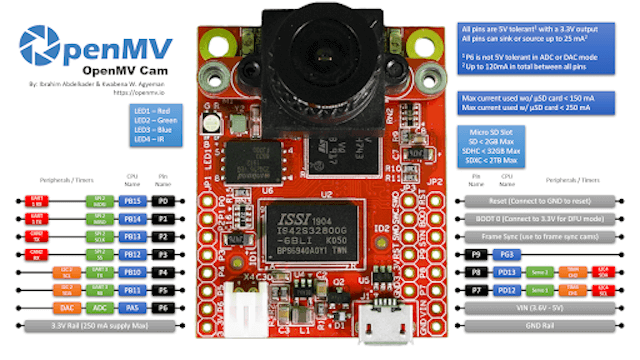
The OpenMV board is equipped with the following features:
- The STM32H743VI ARM Cortex M7 processor running at 480 MHz with 1MB SRAM and 2MB of flash.
- An additional 32MB of SDRAM, and 32MB of flash, neither of which were necessary for this project.
- A removable camera module system that allows the board to interface with different sensors.
- A LiPo battery connector compatible with 3.7V LiPo batteries.
Building a Facial Expression Recognition System with the OpenMV Board
Step 1: Prepare for Setup
Hardware Requirements
You will need the following hardware for this project:
- Micro-USB cable
- OpenMV Cam H7 Plus
- WiFi Shield (Optional. Only needed to publish data to AWS.)
Development Environment
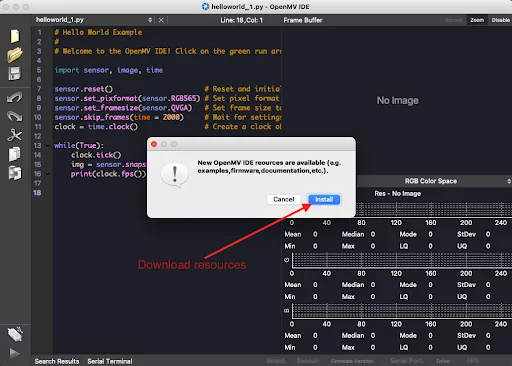
The first step is to get the OpenMV IDE and install it. After installing the IDE, ensure that you download all of the most recent IDE resources.
Step 2: Set Up the OpenMV Cam
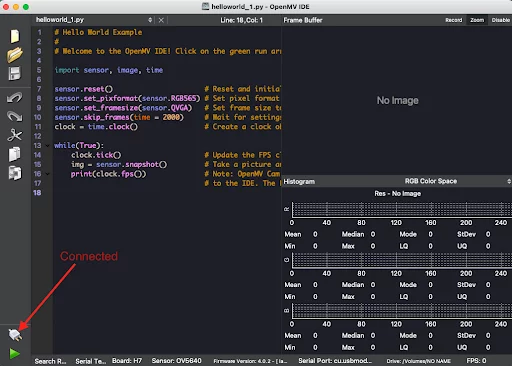
Connect the board to your computer using a USB cable and open the OpenMV IDE. Click on the connect button at the bottom left corner of the IDE. The IDE should indicate a connected status (as shown below).
Step 3: Build the Facial Expression Recognition Program
Camera Sensor Setup
The sensor module will be used to capture images continuously. It will be set up as follows:
import sensor sensor.reset() sensor.set_pixformat(sensor.GRAYSCALE) sensor.set_framesize(sensor.QVGA) sensor.skip_frames(time = 2000) |
The code above will initialize the camera sensor, change the pixel format to grayscale and increase the resolution to 320×240. After changing camera settings, the skip frames() function should be called to give the sensor some time to stabilize.
Face Detection
We leveraged an existing facial detection algorithm and integrated it into our pipeline. Frontal face Haar Cascades are used to determine if an image contains a face. The frontal face feature descriptors will be loaded into memory using the image.HaarCascade module. After creating a Haar Cascade object, we will use it to find faces in our image. The image.find_features() function will scan the image and return bounding boxes for areas that match a face. The following snippet will detect faces in images captured by the sensor:
... import image face_cascade = image.HaarCascade("frontalface", stages=25) while(True): clock.tick() img = sensor.snapshot().gamma_corr(contrast=1.5) objects = img.find_features(face_cascade, threshold=0.75, scale_factor=1.25) for obj in objects: # Do further processing using the bounding box “obj” |
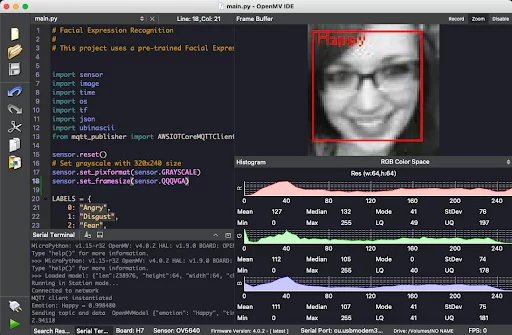
Facial Expression Recognition
Our facial expression recognition system uses models and datasets from the Kaggle Facial Expression Recognition Challenge. We used a pre-trained convolutional neural network model implemented by Shenk et al. but needed to convert the model to TensorFlow Lite to run it on the OpenMV board. OpenMV provides a module for executing TensorFlow Lite models. To convert the high-level Keras model to TensorFlow Lite, we will use the TensorFlow Lite Python API.
# args contains input and output directory for the model converter = tf.lite.TFLiteConverter.from_saved_model(args.model_dir) converter.target_spec.supported_ops = tflite_model = converter.convert() with open(args.output_dir, 'wb') as f: f.write(tflite_model) |
After generating the TensorFlow Lite model, the next step is to load to the OpenMV board using the IDE. Go to Tools > Open OpenMV Cam Drive Folder. This will open the OpenMV Folder, allowing you to copy the generated model. Once the model is copied to the board, we can use the tf module to load it into memory.
net = tf.load("baseline_emotion_model_comp.tflite", load_to_fb=True) |
We can begin detecting expressions — happiness, sadness, neutrality, disgust, surprise, anger or fear — from the faces after loading the model.
LABELS = { 0: "Angry", ... } objects = img.find_features(... for obj in objects: scores = net.classify(img, roi=obj).output() max_idx = scores.index(max(scores)) print("Emotion: %s. Scores: %f" % (LABELS[max_idx], scores[max_idx])) # Annotate the image img.to_rgb565() img.draw_rectangle(obj, color=(255,0,0)) img.draw_string(obj + 3, obj - 1, LABELS[max_idx], mono_space=False, color=(255,0,0)) |
Step 4: Send Data to the Cloud
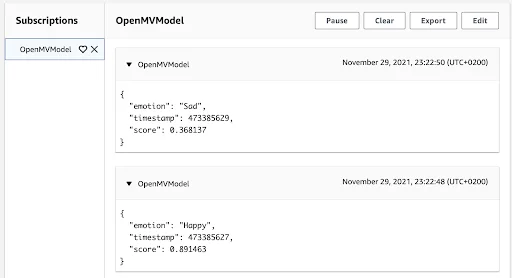
After the model has successfully detected a facial expression from the image the camera captured, the next step is sending that information from the edge device up to the cloud. With the help of a Wi-Fi module that is connected to the OpenMV board, we will publish predictions to AWS IoT Core using the MQTT protocol. We also have a rule that writes the incoming data to this topic to an S3 bucket for further analysis and other studies down the road.
To run our model at the edge, we packaged the code as a function that runs indefinitely on the Open MV board. In this example, our function analyzes captured images of faces to recognize whether those faces are making any one of seven expressions. Please find a downloadable snippet of the code we used for this application here.
Conclusion
While this blog post simplified the steps involved in building an edge ML/AI application using an OpenMV board, knowing how to leverage the power of artificial intelligence and machine learning at the edge of a network will only become increasingly important as IoT devices and applications continue to connect our world and move society forward. As these gadgets continue to proliferate, it will only be a matter of time before ML-powered edge devices revolutionize how we live, work, learn and entertain ourselves.
At Cardinal Peak, we recognize how exciting an edge-driven future will be, and we’re already experimenting with edge ML-based solutions to eventually bring incredible innovations to organizations across industries. If you’re curious about how your organization can leverage the transformational power of edge-based machine learning, let us know!
Check out our “how to” blog, in which we detail how we optimized our edge ML application with the CubeAI tool.