Today, artificial intelligence is leveraged by a number of everyday tools and industries, from connected devices and autonomous vehicles to healthcare predictions and nearly every market in between. And as AI becomes increasingly ubiquitous, it is now being deployed at the edge, not just in monstrous centralized data centers or in the cloud.
In the first blog post in this series, we tackled the differences between deploying AI and machine learning at the edge vs. doing so in the cloud and the advantages of each approach. The second post delved into how to build edge AI/ML applications using the OpenMV Cam H7 Plus board and AWS IoT Core, while this post will highlight the steps required for optimizing edge ML/AI applications using our partner STMicroelectronics‘ STM32Cube.AI, an AI expansion pack for the STM32 family of 32-bit microcontrollers.
Contents
Utilizing STM32Cube.AI
STM32Cube.AI makes artificial neural network mapping easier than ever before. It’s capable of converting neural networks from popular deep learning libraries to run optimized inferences on STM32 microcontrollers. The extension pack was designed to help developers starting with large models to compress and optimize them onto small devices like the OpenMV board or any other STMicroelectronics boards.
The software suite comprises the following:
- X-Cube expansion software X-CUBE-AI
- The Function Pack FP-AI-SENSING1 that provides application examples for ST’s SensorTile development kit
- Updates to the company’s ST BLE Sensor application for iOS and Android that offer a GUI and controls for the Function Pack’s demos
STM32Cube.AI is interoperable with popular deep learning training tools, compatible with many IDEs (or coding tools) and compilers, is both sensor- and RTOS-agnostic, and it allows multiple artificial neural networks to be run on a single STM32 MCU.
The Steps Involved in Optimizing an Edge AI/ML Application with STM32Cube.AI
This blog post will go through the steps involved in integrating the facial expression recognition model used in the second post of this series into the OpenMV environment. The steps, shown in the figure below, involve training a model for the task using STM32Cube.AI to generate an optimized C code for the model before building and flashing firmware that includes the model code onto the OpenMV device.

Source: https://wiki.st.com/stm32mcu/wiki/AI:How_to_add_AI_model_to_OpenMV_ecosystem
Step 1: Build and Train Your Model
Be sure your model has captured a sufficient amount of representative data about the phenomenon you’re modeling. X-CUBE-AI supports models trained with TensorFlow, Keras, PyTorch and other software libraries for machine learning and artificial intelligence, and the STM32Cube.AI tool offers simple and efficient interoperability with popular deep learning training tools widely used by the AI developer community. The output of these tools can be directly imported into the STM32Cube.AI.
Step 2: Set Up the STM32Cube Development Environment
Once the model is loaded onto the microcontroller, we can code a program to perform inference. In our case, we utilized a pre-trained convolutional neural network model to recognize seven different facial expressions: happy, sad, surprise, angry, fear, disgust and neutral. The next step is to set up the dev environment. On the STMicro site, there is a list of essential tools you need to build dependencies, packages, etc. Download and install them.
We have written a docker image that includes all of the required dependencies to compile and build firmware with the network data.
- Download the latest version of the X-CUBE-AI tool for Linux and extract the archive.
- Build the firmware and network data using the Dockerfile. Please find a downloadable snippet of the code we used for this application here.
docker build . -t cube_ai --build-arg X_CUBE_AI_LINUX_PATH=stm32ai-linux-6.0.0.zip \ --build-arg X_CUBE_AI_PACK_PATH=STMicroelectronics.X-CUBE-AI.6.0.0.pack |
Ensure that you provide the correct paths to the downloaded X-CUBE-AI library.
Step 3: Optimize Your Model for the STM32 MCU and Build the Firmware
Once you have built the cube_ai docker image, prepare to optimize the model you’re using for the STM32 microcontroller. Go to your workspace, create a directory and copy the model file.
mkdir data && cp {path_to_model_file} data/
|
Ensure that you provide the correct path to your model.
docker run -v {full_path_to_data_folder}:/data cube_ai data/{model_file}
|
Also, make sure to provide the full path to the data folder we just created and the model file.
The command will generate an optimized model and firmware. The output will be written to the ./data/output directory.
data/ ├── baseline_emotion_model.hdf5 └── output ├── firmware.bin └── model ├── network.c ├── network.h ├── network_config.h ├── network_data.c ├── network_data.h └── network_generate_report.txt |
The network_generate_report.txt file will include what the memory and flash requirements are for the generated model. The model we generated requires a minimum of 361.15 kibibytes (KiB) of RAM and 221.00 KiB of flash memory to store the weights. You can compare these with the available memory and flash on the board. Using the STM32CubeMX tool, we can get the available resources on the STM32H743II processor found in the OpenMV board. As you can see in the image below, our model requirements are well under our memory and RAM limit.

Step 4: Embed Optimized Code
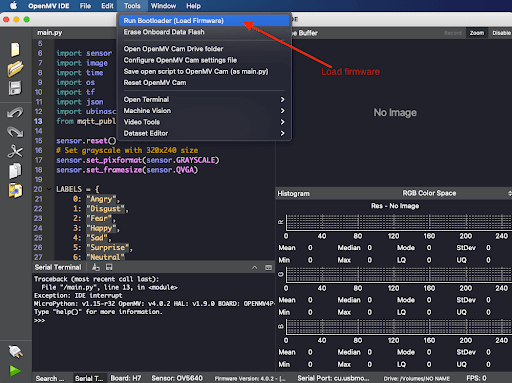
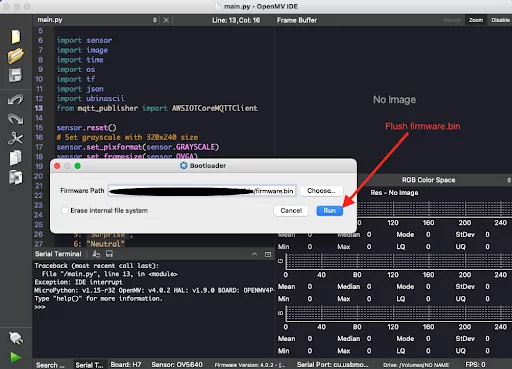
This is where we begin to diverge from what we did to build our application on the OpenMV board. Once you have built the firmware that includes the optimized model, using the OpenMV IDE, take your firmware file from your local directory and flash it to the OpenMV board.
Open the OpenMV IDE, go to Tools > Run Bootloader (Load Firmware), then select the firmware.bin output file and load it to the board as shown below.
Step 5: Run Inference Using the Model
Once the board has that firmware file, the optimized model will be available on your board and you can write Python programs to use the model you’ve embedded in the firmware. The STM32Cube.AI microPython wrapper will be used to load and perform inference using the generated model.
import nn_st # Load the wrapper net = nn_st.loadnnst('network') |
And perform the prediction:
import nn_st import sensor ... while(True): ... img = sensor.snapshot() scores = net.predict(img) # returns a list of predictions ... |
Conclusion
At the end of the day, as our partner STMicroelectronics pushes further into the realm of edge AI and TinyML, the leading electronics and semiconductors manufacturer makes it easier than ever to quickly prototype innovative edge AI/ML applications thanks to integrated software packages. As edge computing grows in popularity, organizations across industries are increasingly leveraging edge solutions to process data locally using machine and deep learning algorithms.
Understanding that artificial intelligence and machine learning are critical drivers for growth in the electronics space, we — as you can see — are already investigating and tinkering around with AI- and ML-powered edge applications to drive innovation for our customers. No matter the industry your organization operates in, Cardinal Peak can help you capitalize on the power of edge-based artificial intelligence and machine learning. Get in touch with us to start building and optimizing your edge AI/ML application today!