In a previous blog, we set up and registered a RAK7243 LPWAN Developer Gateway with The Things Network (TTN) and verified that the gateway properly forwarded LoRa packets from a node to an application owned by Cardinal Peak.
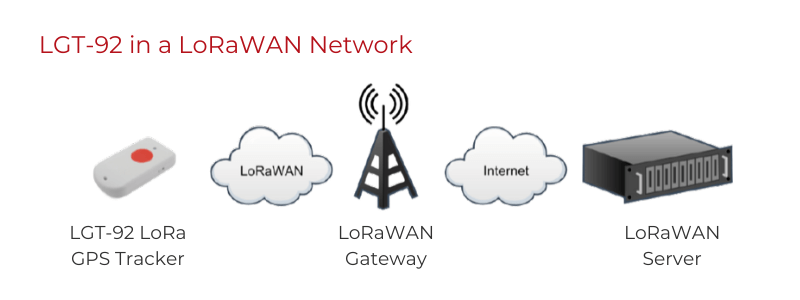
In this blog, we describe how to set up and work with a LoRa GPS-tracker node device. These LoRa devices, among other functions, typically keep track of their location via GPS and send their data through gateways onto the LoRaWAN network. LoRa GPS trackers are used for several applications, such as asset and commercial vehicle tracking and for accident detection (e.g., falls, crashes).
Contents
Our LoRa Device: The Dragino LGT-92 GPS Tracker Node Device
We wanted an open-source and customizable device, so we picked the Dragino GPS Tracker LGT92 kit, available through RobotShop.
The LGTG92 is available in two variants:
-
- LGT-92-LI – powered by 1000mA Li-ion battery, rechargeable over USB.
- LGT-92-AA – powered by AA batteries, with the charging circuit disabled for lowest power consumption.
We ordered the LI variant.
Advertised Power Consumption
-
- Sleeping Mode: 77uA (for LGT-92-LI), 3uA (for LGT-92-AA).
- Tracking: max: 38mA.
- LoRa Transmit: 24 ~ 150mA.
System Components
-
- STM32L072CZT6, Cortex-M0, 192KB flash, 20KB RAM, 6KB EEPROM.
- Quectel GPS L70-R.
- TDK InvenSense MPU-9250 9-axis (gyro, accelerometer, compass) motion tracking device.
- Internal LoRa FPC antenna.
- LoRa radio.
Unpacking the LoRa GPS Tracker
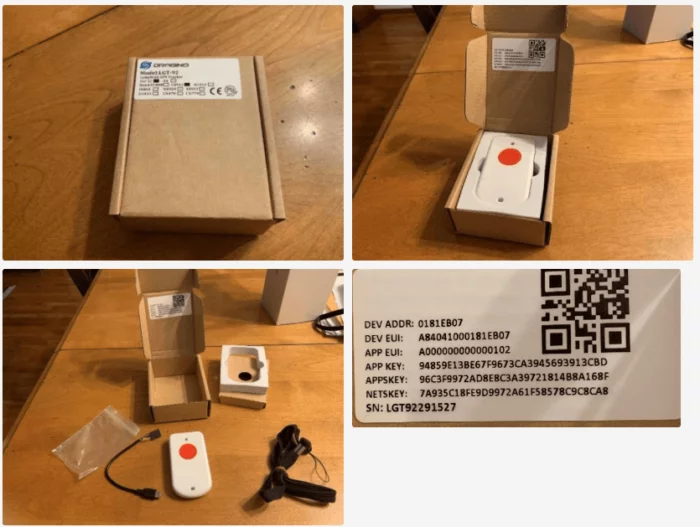
Package Contents
-
- LGT-92 unit configured for US915 LoRa band. The unit has a large red button, LED, micro-USB port and on/off switch.
- Dupont cable, 4-pin female header to micro USB.
- Lanyard.
LoRa Device Setup on The Things Network (TTN)
Introduction
This section documents the steps we followed to set up the LGT-92, starting from the contents in the box to configure the device to work with an application hosted at The Things Network.
Documentation and Source Code
Documentation is available at Dragino’s LGT-92 download page, where we can also find various LGT-92 firmware images.
Source code can be found on GitHub.
Configure and Connect to The Things Network (TTN)
The LGT-92 was preloaded with firmware and configured with over-the-air (OTAA) keys, as well as device and application EUIs, making it ready to activate and join a LoRaWAN network.
A good configuration tutorial video is available here.
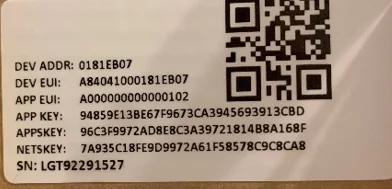
Find the OTAA keys and configuration EUIs
The keys and EUIs were posted on a sticker in the LGT-92’s box:
Create an application
-
- Navigate to the TTN website and log in to your account (create a new account if needed).
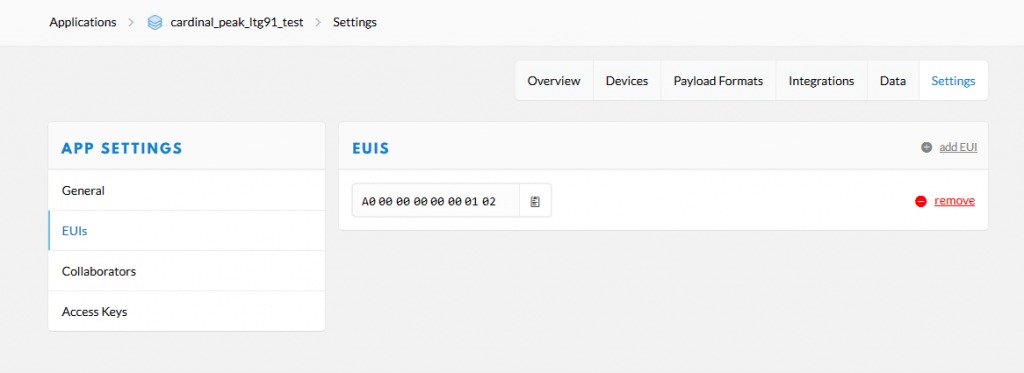
- Go to the account console’s application section and create a new application. For this, just enter an application ID and description. A default application EUI is generated by TTN, but out of the box, the device is configured for a different application EUI. We need to go to the app settings’ “manage EUIs” section, delete the default application EUI and add the application EUI from the sticker:
Add the LoRa device to the application
-
- Register the LGT-92 to the new application by navigating to the applications page and clicking “register device,” which will present the registration page.
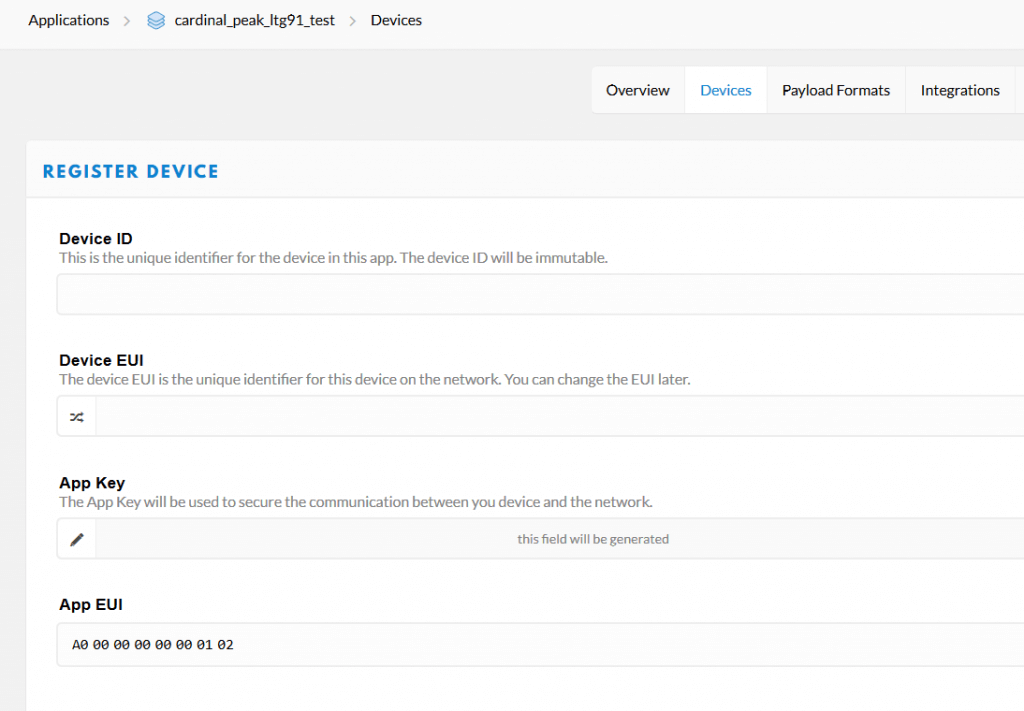
-
- Enter the device ID, which can be anything. Also, enter the device EUI and app key from the sticker info. Here is the resulting device page:
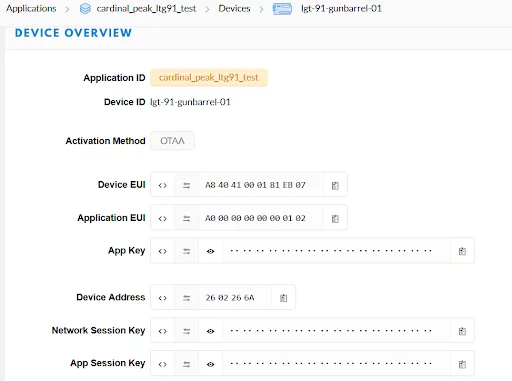
Again, only the device ID, device EUI and app key were required to register the device. The device address and the session keys were generated during the secure activation process.
Observe LoRa Device Data
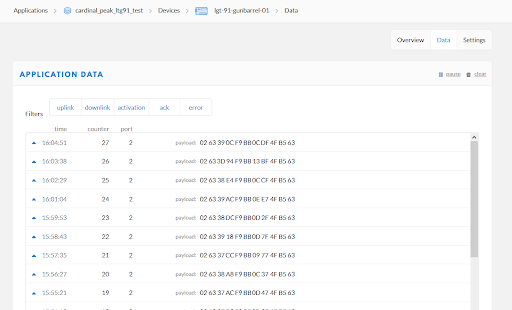
Power the LoRa device on using the on/off switch, and if the EUIs and keys were entered correctly, the device will activate, join the network through our local Cardinal Peak gateway and begin transmitting data. This can be verified by looking at the device’s data page:
With out-of-the-box firmware, the LGT-92 transmits as follows:
-
- Once an hour if the device has not moved.
- Every five minutes when the device is moving.
- Every minute if the alarm button is pressed and held for more than three seconds (keep the button pressed until LED activates). It continues in this mode for one hour.
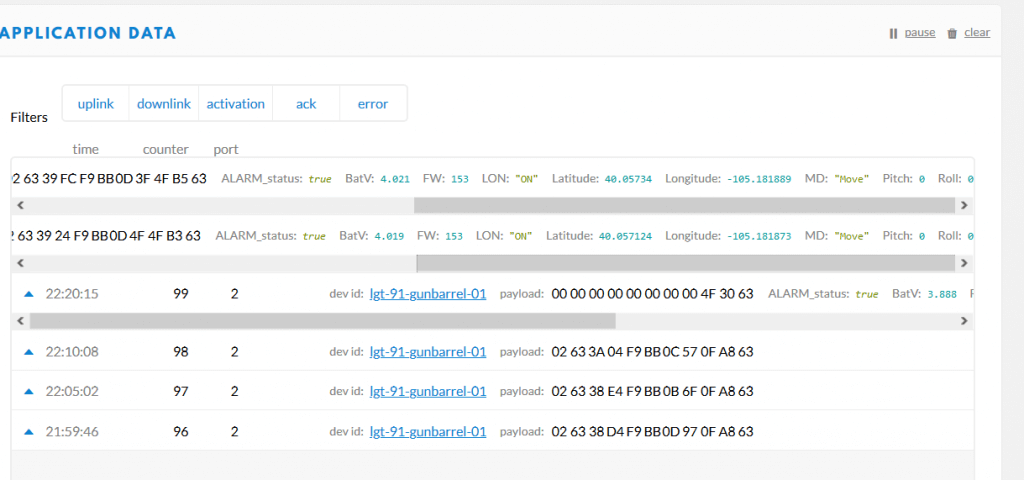
The screenshot above was taken after pressing the alarm, so we see the data come in every minute.
Decode the LoRa GPS tracker data
At this point, the payload data appears as hex characters in the device’s data page. TTN offers a way to add a JavaScript function to have the application decode the data into a friendly format. To do this, go to the “Payload Formats” tab in the applications page, select the decoder option and add the code snippet.
For our device, we found decoders in the LGT-92 downloads page, where we picked the latest decoder version, hoping that it would correspond to the version of the firmware in our device:
-
- Copy the decoder code and paste it into the decoder text window.
- Test the decoder by copying a payload from the data window and pasting it onto the test payload window.
- Verify that the resulting JSON object is correct for the given input data.
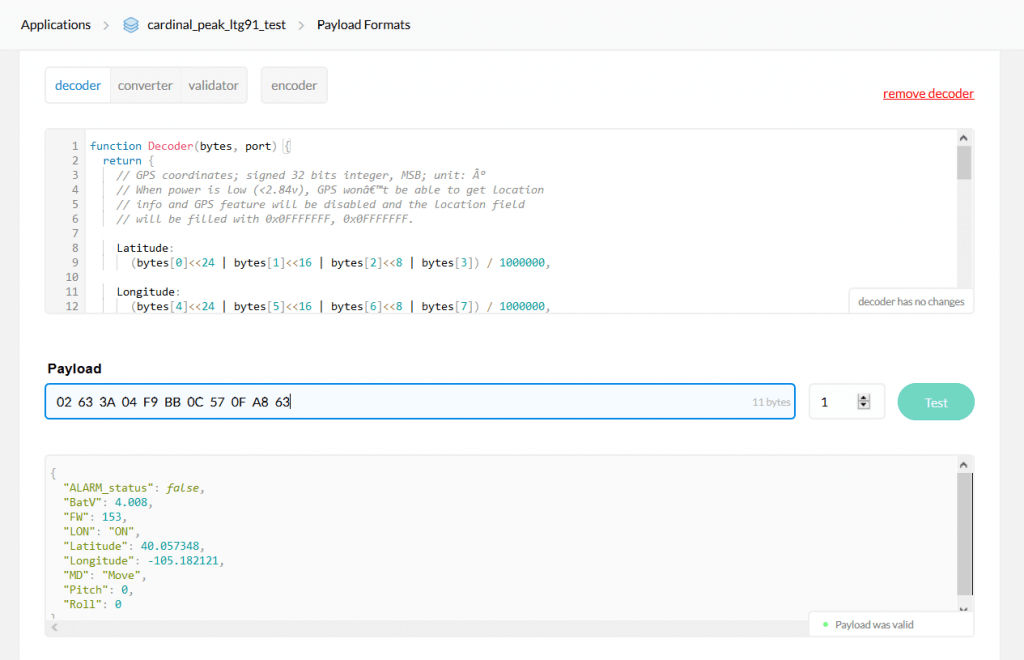
Looking at the device’s data stream, we can see both the raw and decoded data. For example, in the screenshot that follows, the last two payloads show the correct device GPS coordinates, battery voltages and alarm status.
In this blog, we described Dragino’s LGT-92 device and showed how to connect it to an application running on The Things Network.
If you have any questions about setting up and working with a LoRa GPS-tracker node device or if your next project requires our LoRa device expertise, contact us today!
Additional Resources
Check out our other blog posts on LoRa:
- Validating LoRa Range: Insights From Real-World Testing
- Everything You Need To Know About LoRa & How To Set Up A LoRa Gateway To View IoT Device Data
- LoRa And Semtech And Sigfox, Oh My