As technology advances and the Internet of Things grows, Wi-Fi and Bluetooth may no longer be the best communication technologies for IoT applications. With experts predicting there will be 75 billion connected devices by 2025, the demand for bandwidth is exploding — and one wireless communications technology is emerging as a much better fit for myriad industries: LoRa.
This blog post covers two parts: the basics — everything you need to know about the LoRa gateway and its relation to the IoT — before part two walks you through the step-by-step process for setting up a LoRa gateway using a Raspberry Pi.
Contents
Introduction to LoRa
LoRa is a low-power long-range radio IoT technology that enables simple, secure worldwide deployment of sensors and other LoRa IoT devices for a number of applications. In LoRa terminology, these deployed devices are called “nodes.”
What Does LoRa Stand For?
LoRa, short for Long Range, is the physical layer, or the wireless modulation, utilized to create the long-range communication link. The wireless communication system, with its long-range communication distance, low-power consumption, minimal cost and encrypted data transmission, provides much greater coverage than cellular networks.
What is LoRa in IoT?
LoRa’s long range and low-power nature make it critical for the multitude of applications in the IoT the technology unlocks. The IoT typically has many technological solutions to transfer data over a network, but long transmission distance and energy conservation remain challenging since more energy is always necessary to transmit data over longer distances. By ensuring both long range and low power, LoRa is the optimal choice in situations where transmitting a small amount of IoT data over a long distance is needed.
How Does LoRa Work?
Based on chirp spread spectrum technology (CSS), LoRa runs on top of the LoRaWAN network protocol, transmitting encoded small data packets over long-range distances using frequency chirps with a linear variation of frequency. The low-power, long-range radio IoT technology “talks” to end nodes — and vice versa.
With LoRa, according to a 2016 study, the frequency offset between the transmitter and the receiver can reach 20% of the bandwidth without impacting decoding performance. When considering LoRa IoT app development, it is important to keep in mind that these devices transmit at ISM frequencies (915 MHz in the U.S.), with an advertised line-of-sight range of up to 10 kilometers or so. In urban settings, do not expect ranges of more than 2 km to 3 km.
What is a LoRaWAN Gateway?
LoRaWAN is a set of communication protocols and system architecture designed for a LoRa long-distance communication network. At its core, a LoRa network (aka LoRaWAN) consists of nodes, gateways and LoRa network operators. Typically, nodes broadcast data to be picked up by gateways that forward the information to operator servers for processing. The term “gateway” often refers to the physical casing that contains the hardware and application software necessary to connect IoT devices to the cloud.
A LoRaWAN gateway acts as the link between the source of data and end users. Devices send signals as RF packets to be picked up by gateways in range, and the strongest LoRa IoT device to gateway connection passes the message on to the cloud. Having more than one LoRaWAN gateway adds resilience to a network in the event that one fails.
LoRaWAN accommodates the need for longer battery life, with a trade-off of longer latency and smaller packet sizes. By enabling scale for LoRa IoT devices, these gateways help enable better visibility, cost reduction, minimized resource inputs, improved safety and better decision-making.
LoRa Vs. LoRaWAN
While commonly used interchangeably, LoRa and LoRaWAN are not synonymous. LoRaWAN is the network on which all LoRa devices operate. The media access control (MAC) layer protocol on top of the physical layer, LoRaWAN defines the communication protocol and system architecture for a device. LoRa, on the other hand, is a radio frequency carrier signal based in the physical (PHY) layer that converts received data into signals. LoRa architecture enables the long-range communication link.
Together, LoRa and LoRaWAN provide the functionality that determines battery life of a node, network capacity, quality of service, security and other applications served by the network.
LoRa Vs. Wi-Fi
While Wi-Fi is certainly an option for long-range data transfer, the cost of providing cell modems and data service for many sensors spread over, for example, a large farm would soon become excessively high. For situations in which you’re only transferring minuscule amounts of data a few times per hour or even per day, Wi-Fi and cellular data speeds are excessive. That’s why LoRa is ideally suited for transferring small amounts of data over a few kilometers.
LoRa Vs. Zigbee
Both LoRaWAN and Zigbee are low-power IoT networks. Zigbee also has long-range options that can rival the distances of LoRaWAN — or even exceed the range with multihopping in the mesh networks. A LoRa network has a star topology, which means each node needs to communicate directly with a gateway and is used for low-cost sensing applications. Alternatively, Zigbee has a more flexible, reliable and expandable mesh network topology, with nodes that can communicate with any other node on the mesh network. Zigbee is more reliable and is used for both monitoring and control, whereas LoRaWAN is limited to the use of low-cost, low-power sensing.
What is LoRa Used For?
Examples of LoRaWAN Applications / LoRa IoT Devices
From energy management, natural resource reduction and pollution control to infrastructure efficiency and disaster prevention, some of the biggest challenges facing our planet can be solved with smart IoT applications enabled by LoRa devices and networks. Compatible with a wide range of IoT applications, a LoRaWAN network can be successfully deployed for the following use cases:
- Environmental monitoring
- Energy management
- Street lighting
- Parking meters
- Waste management
- Leak detection and flood management
- Air quality control
- Smart building heating, ventilation and air conditioning
- Temperature monitoring
- Motion detection
- Smart water metering
- Fire, flood, CO/CO2 level monitoring
- Fleet monitoring
- Logistics/transportation management
- Health/fitness performance status monitoring
- Public safety solutions
- Agriculture sensors
- Asset tracking
- Cold-chain storage monitoring
- Industrial Internet of Things (IIoT) equipment tracking
2022 LoRaWAN Coverage Map
Source: LoRa Alliance®
With great reliability and practicality, LoRaWAN has widespread network deployment as there are more than a hundred LoRaWAN network operators around the world.
Clearly, LoRa and LoRaWAN will play a significant role in our increasingly connected future. As the world becomes “smarter,” LoRaWAN reduces the power limitations of other wireless technologies to enable interconnected LoRa devices to create smart cities and industrial and commercial solutions.
Now that you are equipped with all of the knowledge one would need about LoRa and LoRaWAN, the second half of this blog post will dive into how to set up a LoRa gateway — the link between the source of data and end users.
How To Set Up a LoRa Gateway to View IoT Device Data
Before Setting Up the LoRa Gateway
In this blog, we document the steps required to set up a LoRaWAN gateway from scratch, register it with The Things Network and observe uplink data from a simple LoRa node. In future blogs, we will dive into details of the hardware and firmware/software for both LoRa IoT devices and gateways.
Select a Raspberry Pi-Based Gateway
There are a number of gateway products available, but we picked one based on the developer-friendly Raspberry Pi.
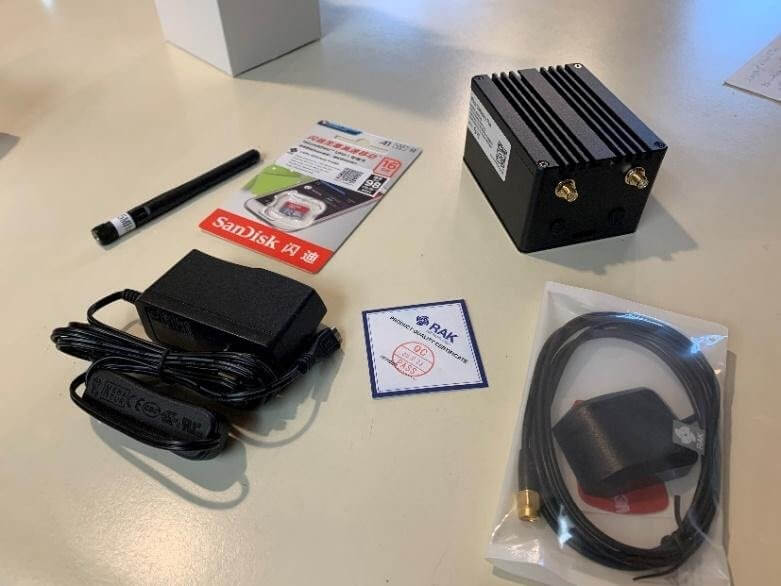
We picked the RAK7243 LPWAN Developer Gateway, purchased from Sparkfun. The gateway hardware consists of a Raspberry Pi 3 B+, with a RAK2245 concentrator module HAT that is installed over the Pi’s pins:
The kit is advertised to contain the following:
- Raspberry Pi 3 B+
- GPS shield
- 915 MHz LoRa concentrator shield
- Aluminum enclosure w/ heatsink
- Power supply 5V, 2.5A
- 16GB MicroSD card
- GPS/GNSS antenna 1m with SMA
- 915 MHz LoRa antenna 2dBi gain, 50 ohm
Unpack the LoRa Gateway
The LoRaWAN gateway arrived nicely packaged:
The contents appeared to be as advertised, with the Pi and concentrator boards preinstalled in the rectangular enclosure:
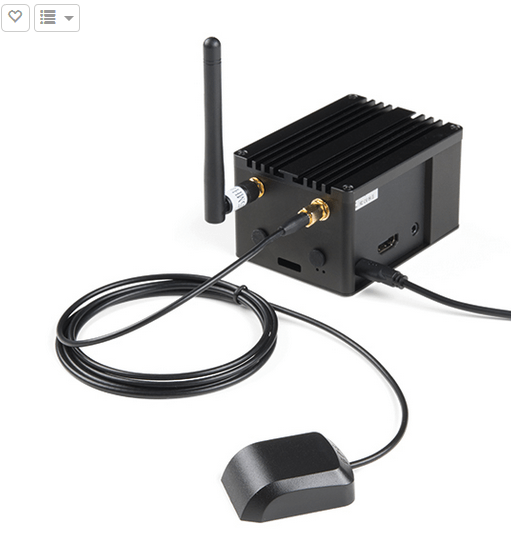
The enclosure has SMA connectors for the GPS and LoRa antennas. LTE is not supported in this kit (see the RAK7243C for LTE support), and the LTE antenna through-holes are plugged.
Setting Up the LoRa IoT Gateway
This section documents our setup steps, starting from the delivered box contents. We considered our setup successful once the LoRa gateway was registered to The Things Network (TTN) and it properly forwarded packets from a known local node device to a TTN application.
Documentation
Sparkfun has some documentation on its product page, but a more complete set is available on RAK’s developer gateway product page.
LoRa Gateway Firmware Installation and Boot
Flash the 16 GB SD card
Installing the LoRa IoT firmware is a matter of flashing the 16GB SD card with the Raspbian image provided by RAKwireless. Initially, we tried flashing the card from a Windows 10 laptop but failed, so we switched to an Ubuntu machine for this.
Just for the record, these are the instructions for flashing from Windows:
- Download the latest RPi Raspbian-based firmware image onto a Windows computer equipped with an SD card reader. There are two image zip files available. Use the one corresponding to the RAK7243, not the one for the LTE-enabled RAK7243C.
- Unzip the downloaded file to get a Linux IMG file, e.g., RAK7243&RAK7244_based_on_Raspbian_OS_V4.2.0_20200311.img.
- Install and launch the Etcher open source utility.
- Insert the 16GB SD card from the kit, which should be detected automatically by Etcher.
- In Etcher, set the source to IMG file, the target to detected SD card, hit the Flash button and wait 2–3 minutes for flashing to complete.
Failure, checksums don’t match, see a forum post about this problem. Apparently, Windows 10 writes metadata that Etcher does not expect, and the workaround is complicated. Other tools might not have this problem.
To flash from a Linux (Ubuntu) machine, follow similar instructions:
- Download the latest RPi Raspbian-based firmware image onto a Linux computer equipped with an SD card reader. There are two image zip files available. Use the one corresponding to the RAK7243, not the one for the LTE-enabled RAK7243C.
- Unzip the downloaded file to get a Linux IMG file, e.g., RAK7243&RAK7244_based_on_Raspbian_OS_V4.2.0_20200311.img.
- Install and launch the Etcher open source utility.
- Insert the 16GB SD card from the kit, which should be detected automatically by Etcher.
- In Etcher, set the source to IMG file, the target to the detected SD card, hit the Flash button and wait 2–3 minutes for flashing to complete.
- Eject the SD card.
Attach antennas, insert SD card and power up
- Attach both antennas (LoRa and GPS). This is important since not having the antennas attached at power up can damage the boards. The following figure shows the antenna connections.
- Insert the flashed SD card. The card slot is near the bottom of the enclosure under the antenna connectors. When inserting the SD card, take care not to push it through the horizontal gap between the SD card slot and the enclosure. If this happens, the gateway must be disassembled to recover the card.
- Connect the power supply to the LoRa gateway’s micro-USB port.
- Turn on the power supply.
- Verify blinking LEDs at the bottom of the enclosure under the GPS antenna.
Test Wi-Fi connectivity
- Verify that the LoRaWAN gateway appears on Wi-Fi as an AP with network SSID of the form Rakwireless_XXXX.
- Connect to the gateway’s network, using “rakwireless” as the default Wi-Fi password.
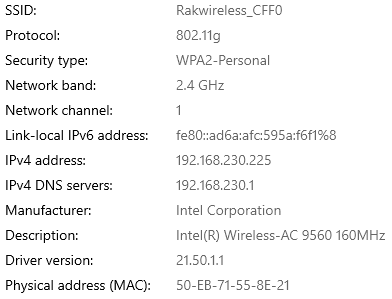
- Check the Wi-Fi settings for the gateway on the connected computer. For example, on a Windows 10 PC, the following information shows the gateway with address 192.168.230.1. The 192.168.230.225 in the figure is the PC’s address on the gateway’s network.
- Check that logging into the gateway via ssh is available over this connection. The default user and password are: “pi” / “raspberry”.
Add the LoRa gateway to an Ethernet LAN
The gateway ships with a fixed IP address 192.168.10.10 when connected over Ethernet and can be connected to a properly configured PC using this address, but in most cases, it is best to have the gateway obtain its address from a managed network. To do this:
- Log in to the LoRa gateway via ssh over Wi-Fi.
- Make a backup copy of existing /etc/dhcpcd.conf.
- Comment out the lines in dhcpcd.conf that create the hard-coded address (ignore the warning not to modify the 5 lines):
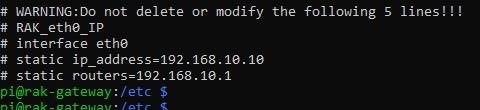
- Reboot the gateway.
- Connect again over Wi-Fi and run “ifconfig” to check the new LAN-provided DHCP address. Modify the LAN router as needed to make the new address permanent for the LoRaWAN gateway.
- Verify that ssh works over the IP address provided by the LAN’s DHCP server.
- At this point, it should be possible to log in with ssh with either the Wi-Fi or the Ethernet connection.
Configure the LoRa Gateway for The Things Network (TTN)
We configured the gateway to work with the TTN community LoRa operator, which supports no-cost LoRa gateway registrations.
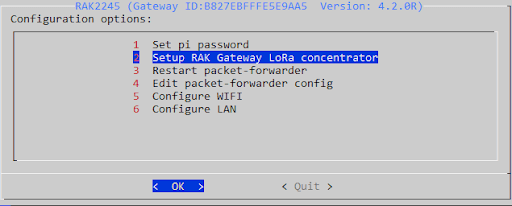
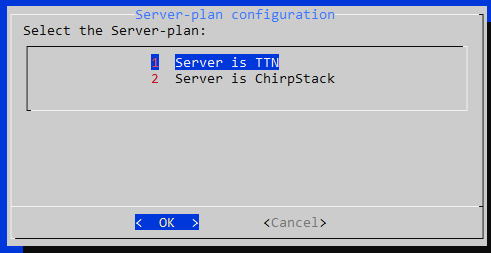
Configure the Gateway’s LoRa Concentrator for TTN
- ssh to the gateway and run the gateway’s configuration tool: sudo gateway-config.
- Select the concentrator menu option and choose “Server is TTN” and the correct channel plan for the gateway’s location. In our case, we chose the US_902_928 channel plan.
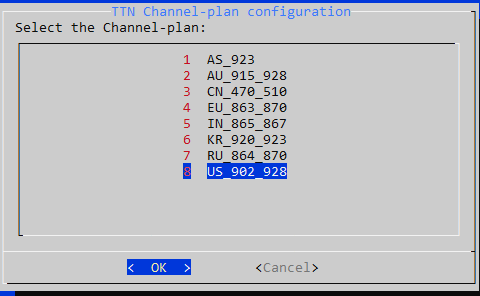 After confirming these settings, the configuration tool reported back with a message indicating that the server configuration had been changed and the packet forwarder had been restarted.
Register the LoRa Raspberry-Pi Gateway on The Things Network (TTN)
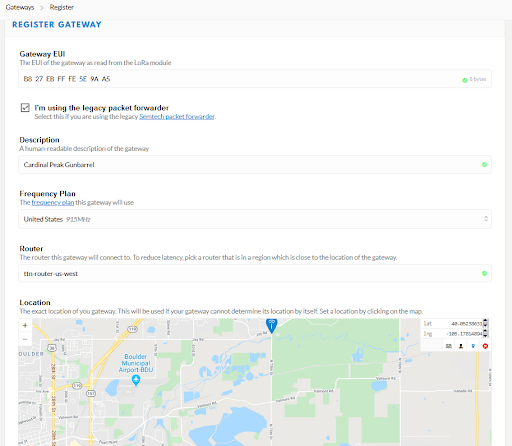
The Gateway EUI
To register the LoRa gateway with TTN, first, obtain the gateway’s ID:

In this example, the ID (EUI) is B827EBFFFE5E9AA5 and corresponds to the MAC address of the LoRa module in the gateway. It is a unique identifier, which is required to register the gateway with any LoRa network.
Create a TTN account and register the gateway
- Go to www.thethingsnetwork.org to create an account.
- Log in to the TTN account and follow instructions for registering the LoRa gateway. Make sure to check the box “I’m using the legacy packet forwarder.” Note: One account can support multiple gateways.
Wait for TTN to indicate a successful connection with the gateway
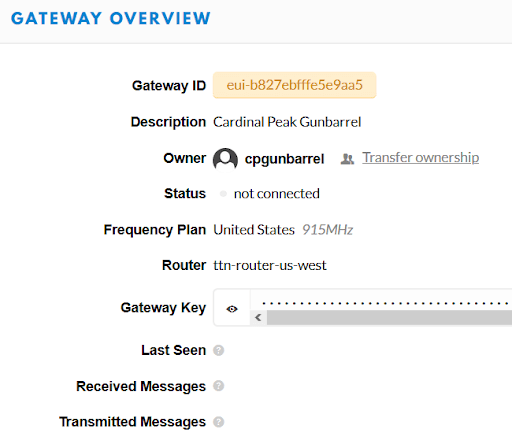
Immediately after registration, TTN will indicate “no connection”:
Troubleshoot the connection to TTN server
If TTS continues to show a disconnected status, then check the TTS network. In our case, the TTS network looked fine, so we tried to establish a TCP connection from the LoRaWAN gateway to the server’s MQTT port, using:
pi@rak-gateway:~ $ nc -v bridge.us-west.thethings.network 1883
and failed initially. Turns out port 1883 was blocked in our router, and the same command was successful after unblocking the port.
Note: The host name “bridge.us-west.thethings.network” was obtained from the registration, and 1883 is the standard port for the MQTT protocol used by gateways to communicate with TTS.
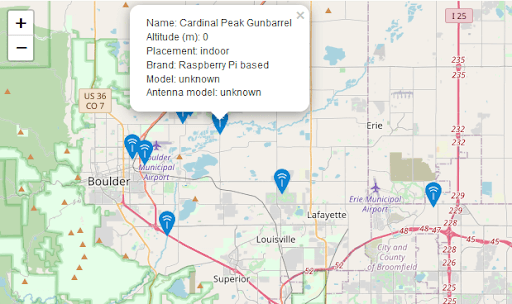
Locate the gateway in TTN’s map
The TTN site includes a world map of all registered gateways. The following screenshot shows our LoRa gateway (Gunbarrel), as well as another gateway we have previously set up at Cardinal Peak’s main office. As a whole, Colorado currently has about 20 LoRaWAN gateways registered to TTN, North America has approximately 750 registered gateways, and Europe carries the bulk with over 7,000. The worldwide active total for TTN is a little over 10,000. These numbers are only for TTN and don’t include gateways for other LoRaWAN operators.
Mystery: TTN doesn’t show the right GPS coordinates, but the GW logs indicate the GW is sending proper GPS:

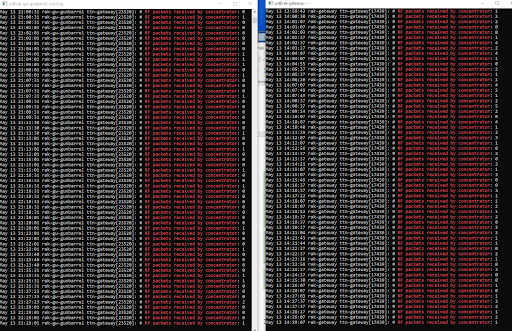
Gateway Logs
The gateway writes logs in /var/log/syslog. The screenshots below show logs (grepped for concentrator packets) at the Gunbarrel (left log) and CP office (right) gateways. As expected, the office gateway, with its larger 5.8 dBi outdoor antenna, shows more packets (about 5–10 times) than Gunbarrel, which has the small 2dBi antenna provided in the kit.
Observe Data from a Nearby Node
For our test node, we used a SparkFun Pro RF LoRa 915MHz LoRa IoT device that was previously registered with TTN and associated with a simple test application owned by Cardinal Peak. A future blog will discuss how to configure and register a device with TTN, and how to securely associate it with an application. For now, we are simply interested in verifying that the data from this particular device can make it to the application via our newly created gateway.
For this test, the device and the gateway were placed within a few feet of each other. The device was powered over USB.
To look at the node device data, we logged into the TTN account that owns the application, navigated to the application’s console and, from there, moved to the LoRa IoT device’s data page:
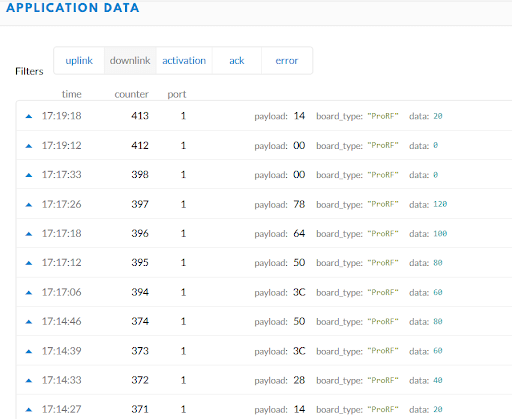
This page displays uplink data in real time, and we can see that the device sends a payload every six to seven seconds. To verify that the data was flowing through our gateway (and not being picked up by the gateway at Cardinal Peak’s office), we shut down the gateway, restarted it, and observed how the flow stopped and resumed accordingly. In the display above, we see gaps after counter numbers 374 and 398, which correspond to the intervals where the gateway was shut down.
Conclusion
While there are myriad steps involved in setting up a LoRaWAN gateway from scratch, registering it with The Things Network and observing uplink data from a simple LoRa IoT node, it is a crucial step in integrating IoT technologies into the embedded devices and applications that drive our world forward.
If you have any questions or want to tap our LoRa expertise for your next project, let us know!
If you enjoyed this blog and are curious about our job openings, check out our careers page below.